Hiring a Garnishment Payee Profile
Look Up Employee Information
Before creating the Garnishment Payee profile, you will need to know the department number of the employee the garnishment court order was received for
1. Under the Employee Maintenance section click on Payroll Profile
2. Look up the employee
3. Click on the Departments tab and make a note of the department shown here
Create the Garnishment Payee Profile
1. Under the Employee Maintenance section click on Payroll Profile
2. Click on the Hire Employee link
3. Populate the Wizard with the following information:
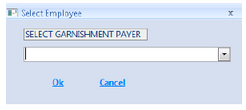
- At the top of the screen select Garnishment

In the Select Employee box, select the employee that the garnishment
order is for from the dropdown and click on Ok
4. On the Employment Profile tab, populate the following fields:
a.Personal Information Box
Payee = name of Garnishment Payee
Last Name = leave as default
Populate any other required fields (marked by an (*)asterisk) as needed
b.Employee Information Box
Hire Date = defaults to current date; enter the date the garnishment court order was received
Employee Number = leave with auto populate number or edit
Populate any other required fields (marked by an (*)asterisk) as needed
c.Contact Information Box
Address, City, State, Zip = Garnishment Payee’s mailing address
Populate any other required fields (marked by an (*)asterisk) as needed
d.Position Information Box
Department = the employee’s home department number
Populate any other required fields (marked by an (*)asterisk) as needed
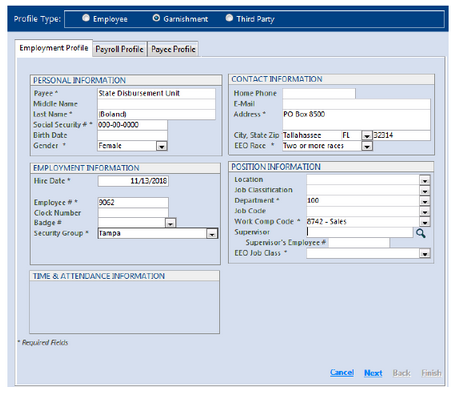
5. Click on Next
6. On the Payroll Profile tab, populate the following fields:
a. Salary/Pay Information Box
Earning Group = leave as default
Pay Cycle = update based on employees pay cycle if needed, otherwise leave as default
Salary/Hourly = choose Hourly or Salary based on the employee’s status
Full/Part Time = leave as default
b. Primary Pay Allocation Box = leave all as default
c. Tax/Deduction Information Box
Deduction Group = leave as default
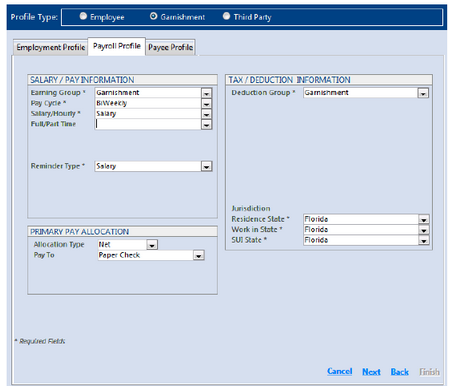
7. Click on Next
8. On the Payee Profile tab, populate the following fields:
a.Garnishment/Third Party Information Box
Payer Name = confirm this is the full name of employee on Garnishment Order
Payer SSN = leave as default
Payee = leave as default
Case # = enter the garnishment case number indicated on the court order
Order # / Loan # = add if applicable
FIPS Code = add this code if noted on the Court Order
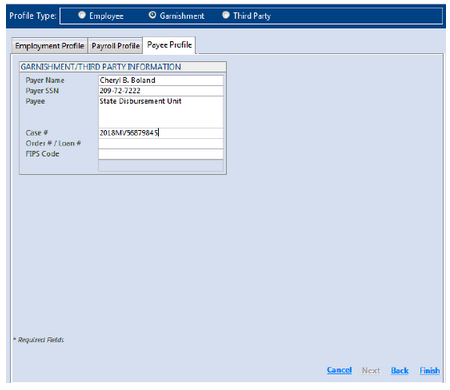
9. Click on Finish. A message will display stating that the payee has been created and to finish setting up the final information; click on OK
Setting up Garnishment Deduction Setup Instructions: